Explore Hyperledger Indy Command Line Interface
Recipe ID: hsts-r24
Self-paced training
We offer blockchain introduction, Hyperledger for system admin, Ethereum, Solidity, Corda R3, Hyperledger for developers, blockchain cybersecurity and more classes in self-paced video format starting at $60. Click here to learn more and register. For complete self-paced blockchain training, visit our Complete Blockchain Development Training page.
Recipe Overview
Hyperledger Indy is a distributed ledger in The Linux Foundation family which is built for decentralized digital-identity management. Hyperledger Indy is in its incubation stage so in this recipe we will explore the Indy Command Line Interface or CLI to look at the concept and functions offered by Hyperledger Indy with the current distribution. For those who are not familiar with Hyperledger project Intro to Hyperledger Family and Hyperledger Blockchain Ecosystem and Hyperledger Design Philosophy and Framework Architecture articles are strongly recommended.
To better follow and understand this tutorial, it is advisable to read and follow Install Hyperledger Indy on AWS recipe in advance.
In this recipe, we will explore the design and intention for the wallet, Decentralized Identifier (DID), pool, and ledger transaction in a Hyperledger Indy network:
- Wallet: Hyperledger Indy manages identity with a new approach, Decentralized Key Management System (DKMS), which manages identities on distributed ledger technologies such as the blockchain network. DKMS is different from the conventional public key infrastructure (PKI)-based approach to manage identities per certificate, as issued by the centralized CA. In Hyperledger Indy, identities are self-sovereign and are managed by each participant. An identity owner fully controls its identities and credentials and is also independent from any centralized identity providers or certificate authorities.
Identity owners generate and store their private keys, identities, secrets, credentials, and other cryptographic material in the wallet. Each participant in the network communicates, signs, and proofs its identities and credentials to the network with private data in the wallet. Consequently, the safety of the wallet is vital to the owner and entities.
The wallet for the client is stored in the user's home directory,
named '~/.indy_client', by default. It is also stored in a SQLite data file, as follows:
ubuntu@ip-172-31-90-67:~/.indy_client/wallet/mywallet$ ls -lia total 132
539445 |
drwxrwxr-x 2 ubuntu ubuntu 4096 |
Dec |
10 |
04:24 . |
|||||||
534504 |
drwxrwxr-x 3 |
ubuntu ubuntu 4096 |
Dec |
10 |
04:22 .. |
||||||
539448 |
-rw-r--r-- 1 |
ubuntu ubuntu 57344 |
Dec 10 |
04:24 sqlite.db |
|||||||
539453 |
-rw-r--r-- |
1 |
ubuntu ubuntu |
32768 |
Dec |
14 |
16:52 |
sqlite.db-shm |
|||
539451 |
-rw-r--r-- |
1 |
ubuntu ubuntu |
32992 |
Dec |
10 |
04:34 |
sqlite.db-wal |
|||
- DID: DID is a globally-unique identifier for an entity or individual owner that is not managed by a centralized authority but can be registered with the distributed ledger (https://w3c-ccg.github.io/did-spec/#dfn-dlt), the technology's decentralized network, and resolvable on the ledger without requiring any centralized authority. To maintain privacy, an entity or identity owner can own multiple DIDs. The DID in Indy has the following characters:
- Persistency
- Globally resolvable
- Cryptographically verifiable
- Decentralized
In Hyperledger Indy, there are two types of DID. The first type is Verinym. A Verinym DID is the unique identifier of a legal identity or identity owner. The second type is a pseudonym, which is used to maintain the privacy of a digital relationship or connection between participants. If the pseudonym is used to maintain only one digital relationship, it is also called a pairwise identifier, which maintains secure connections between two participants.
Hyperledger Indy is a permissioned network. DIDs have different types of roles in the Indy network, such as Steward and Trust Anchor. The Steward role is for the person or organization who operates the Indy network. The person or organization with the Steward role could not only create and configure Indy nodes and node pool, but also can create, update, or delete other DIDs and post NYM transactions. The Trust Anchor is mainly used to publish DIDs and post NYM and schema transactions into the ledger. In order to register the other DID into the ledger, the DID to send the NYM transaction should have the Trust Anchor role, or the transaction will be rejected by the Indy pool.
The new DID could be registered to ledger via the nym transaction through the Indy CLI. In the recipe, we first imported the DID named Th7MpTaRZVRYnPiabds81Y, which is defined as the Steward role in the bootstrap network genesis file for the testing network. Then, we activated the DID and used it to send the nym transaction to register a new did, as follows:
pool(sandbox):wallet(mywallet):did(Th7...81Y):indy> ledger nym did=JRAoDbiV2tRfWSL3jcRKCk verkey=~6iKD9dkZEypiugWbDEHsXw role=TRUST_ANCHOR
- Credential schema and credential definition: Credential schema is the base semantic structure to describe the list of attributes that a verifiable credential would contain. Credential definition is used to define the issuer to sign and issue the verifiable credential that was satisfied with a specific credential schema.
The following diagram illustrates the concept of verifiable credentials and DID in the Hyperledger Indy system:
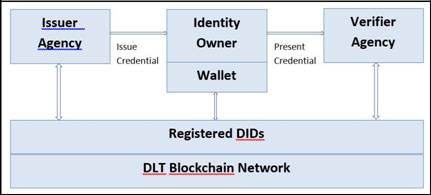
The organization could be the issuer agency or the verifier agency in the Indy network. The organization as the issuer agency would issue a credential to an individual identity owner, such as birth certificate, driving license, or college degree. The organization as the verifier agency could verify credentials that are presented by identity owners and it could also verify that the credential is issued by the trusted issuer agency through the Indy network. Each entity registers their DID on the ledger blockchain network. The published DIDs on the ledger allow entities and identity owners to identify the ownership of the DID and verify whether the credential that was issued by the DID is trustworthy and tamperproof.
The basic workflow is as follows: when a verifier agency requires information from an identity owner (such as whether the user has a driver's license), the verifier agency sends a proof request to the identity owner. The identity owner will then create a credential request to an issuer agency, such as the DMV. The issuer agency will issue the credentials to the identity owner if the owner has a driver's license and signs the credentials. The identity owner would then send back the credentials to the verifier agency. The verifier agency can verify the issuer agency DID, as well as the signature presented in the credentials, and register them in the ledger. If the issuer agency DID is matched with the DID registered in the ledger, the credential is trusted. Any manipulation of the credentials will change the cryptographic signature of the issuer agency.
Note that what is being verified in a verifiable credential is the identity and signature of the issuer agency. Different digital signature formats require different cryptography. In Indy, credentials use zero-knowledge proof signatures (http://groups.csail.mit.edu/cis/pubs/lysyanskaya/cl02b.pdf—Camenisch-Lysyanskaya (CL)) that enable the identity owner to present proof about the credentials without revealing the underlying data.
- Transaction: The ledger command group in the Indy CLI is sending NYM, schema, node, and other similar transactions to the ledger. These transactions are stored in the Indy blockchain network. Each transaction in Indy consists of transaction metadata and transaction-specific data. Its basic structure is as follows:
{
"ver": < transaction version>, "txn": {
"type": < transaction type>,
"data": < transaction specific data fields>,
},
"txnMetadata": {
"txnTime": < transaction POSIX timestamp>,"seqNo": < unique sequence number of the transaction in ledger >,
},
"reqSignature":< submitter's signature >
}
Here are the supported transaction types:
NODE = 0
NYM = 1
ATTRIB = 100
SCHEMA = 101
CLAIM_DEF = 102
POOL_UPGRADE = 109
NODE_UPGRADE = 110
POOL_CONFIG = 111
And here are the supported roles in a NYM transaction:
- None (common USER)
- 0 (TRUSTEE)
- 2 (STEWARD)
- 101 (TRUST_ANCHOR)
One of the genesis transactions to create the initial transaction on the testing network is defined as follows:
{"reqSignature":{},"txn":{"data":{"dest":"Th7MpTaRZVRYnPiabds81Y","role":"2
","verkey":"~7TYfekw4GUagBnBVCqPjiC"},"metadata":{"from":"V4SGRU86Z58d6TV7P
BUe6f"},"type":"1"},"txnMetadata":{"seqNo":2},"ver":"1"}
From the preceding transaction structure, you can see that the transaction is a NYM transaction (type is 1), which is used to create a new DID, Th7MpTaRZVRYnPiabds81Y, is being used as the Steward (the role is 2) in the ledger.
The Indy CLI is the official command-line tool provided by the Heperledger Indy project to interact with the Indy pool blockchain network. It currently provides the following commands, which we will explore in our next recipe (Manage Hyperledger Indy Wallet and DID through Indy CLI and Docker):
- Manage the wallet
- Manage the DID
- Manage the Indy pool
- Post the NYM, schema, and node transactions to the Indy pool ledger
The following recipes are excellent resources for installing other Hyperledger tools:
Blockchain Developer Guide- Overview of Hyperledger Explorer and its Development Environment
Blockchain Developer Guide- How to Install Hyperledger Fabric on AWS
Blockchain Hyperledger Composer Business Network Modeling and Environment Setup
Blockchain Developer Guide- How to Install Hyperledger Iroha on AWS
Blockchain Developer Guide- How to Install Hyperledger Burrow on AWS
To conclude this recipe, we like to recommend our Learn Hands-on Blockchain Ethereum Development & Get Certified in 30 Hrs and Blockchain Hyperledger Development in 30 hours courses to those interested in pursuing a blockchain development career. Indeed, as of this writing, Hyperledger Foundation offers the following two Hyperledger certifications: The Certified Hyperledger Fabric Administrator (CHFA) and The Certified Hyperledger Sawtooth Administrator (CHSA), both of which are highly regarded in the industry. Hyperledger Foundation is in the process of creating Hyperledger Developer certification program, which may be released in early or middle of 2020. In short, by taking our hands-on online Hyperledger class, you would be able to obtain CHFA certification.
This tutorial is written by Brian Wu who is our senior Hyperledger instructor in Washington DC. His Hyperledger Cookbook with 40+ hands-on recipes is highly recommended.
Related Training Courses
Hands-on Node.JS, MongoDB and Express.js Training
Advance JavaScript, jQuery Using JSON and Ajax
Learn Hands-on Blockchain Ethereum Development & Get Certified in 30 Hrs
Learn Blockchain Hyperledger Development & Get Certified in 30 Hrs
Become Blockchain Certified Security Architect in 30 hours
Blockchain Certified Solution Architect in 30 hours
Introduction to Python Programming
Object Oriented Programming with UML
Private and Custom Tutoring
We provide private tutoring classes online and offline (at our DC site or your preferred location) with custom curriculum for almost all of our classes for $50 per hour online or $75 per hour in DC. Give us a call or submit our private tutoring registration form to discuss your needs.