Recipe for Building Ethereum Financial App With Java & Web3j API via Oracles
Ethereum is a general-purpose blockchain that is more suited to describing business logic, through advanced scripts, also known as smart contracts. Ethereum was designed with a broader vision, as a decentralized or world computer that attempts to marry the power of the blockchain, as a trust machine, with a Turing-complete contract engine. Although Ethereum borrows many ideas that were initially introduced by bitcoin, there are many divergences between the two.
The Ethereum virtual machine and smart contracts are key elements of Ethereum, and constitute its main attraction. In Ethereum, smart contracts represent a piece of code written in a high-level language (Solidity, LLL, Viper) and stored as bytecode in the blockchain, in order to run reliably in a stack-based virtual machine (Ethereum Virtual Machine), in each node, once invoked. The interactions with smart contract functions happen through transactions on the blockchain network, with their payloads being executed in the Ethereum virtual machine, and the shared blockchain state being updated accordingly.
If you are not familiar with blockchain technology reading TechSavvy Coders History and Evolution of Blockchain Technology from Bitcoin article is highly recommended.
If you like to learn more Ethereum blockchain development (with Solidity programming), Blockchain Developer Guide- Introduction to Ethereum Blockchain Development with DApps and Ethereum VM, Harness the Power of Distributed Storage IPFS and Swarm in Ethereum Blockchain Applications, and Building Enterprise Blockchain-as-a-Service Applications Using Ethereum and Quorum are highly recommended.
If you have followed and finished our previous recipes, you should thoroughly know by now how to write smart contracts with Solidity, and how to build a complete DApp using web3.js and Drizzle. We focused on building a decentralized web application on Ethereum using a set of tools, such as Remix or Truffle. In this walkthrough, we will learn how to harness a powerful language, such as Java, to build an Ethereum desktop or mobile application. Along the way, we will discover new concepts in Solidity, such as calling third-party APIs in your smart contracts or libraries.
We will break into finance and build a financial project that manages a futures smart contract using Java (SE). Throughout this interesting use case, we will go over the following points:
- Building futures solidity contract
- Introducing oracles
- Introducing the web3j API
Another benefit of this recipe is that building a futures smart contract will help you to understand the disruptive force of the blockchain and how smart contracts can alter the financial industry (for example, futures trading market) by automating payments and facilitating business processes.
Project presentation
I know you're a developer and not a financial nerd. Hence, I will try to introduce the futures concept in the easiest terms. Futures contracts (more colloquially, futures) are legal agreements to buy or sell a given quantity of commodity or asset (barrel of oil, gold, and silver) at a predetermined price at a specified time in the future, hence the name futures.
For the sake of ease and clarity, let's consider an oversimplified version of a real futures contract from the financial industry. Let's suppose that an airline company wants to lock in the fuel price to manage their exposure to risk and to avoid any unpleasant surprises.
Instead of buying the oil and storing it until they need it, they buy a futures contract for oil with a specific date of delivery and price per gallon. For example, an airline company can agree on a futures contract to buy 1,000,000 gallons of fuel, taking delivery 60 days in the future, at a price of $3 per gallon.
In this example, the airline company is considered as hedger while the seller might be considered as a speculator. As the futures contracts may become more valuable if the price goes up, the owner of that contract could sell that contract for more to someone else. That said, we will build a smart contract that implements the logic described here and defines the futures contract's details (asset, quantity, unitary price, and delivery date) along with holding the funds. We will also build a Java application enabling a third party (exchange market authority) to define a futures contract between the other two parties.
The smart contract will also enable the speculator to sell the futures contract to another speculator and calculate its investment offset by comparing the market price to the futures contract price.
This will be a straightforward contract with only a few main abilities and minimalist design.
Futures smart contract
As usual, we kick off the recipe by writing the smart contract code. First, create a directory called FuturesWeb3j (in your home folder) and initiate an empty Truffle project
using truffle init.
Afterward, in the contracts/ folder, create a Futures.sol file with the following code:
contract CFutures { address user; address hedger; address speculator; struct asset{
uint id;
uint Quantity; uint price; address seller; address buyer; uint date;
}
asset TradedAsset;
event DepositEv(uint amount, address sender); function CFutures(
uint assetID, uint Quantity, uint price, address buyer, address seller,
uint date) public { TradedAsset.id = assetID; TradedAsset.Quantity = Quantity; TradedAsset.price = price; TradedAsset.seller = seller; speculator = seller;
hedger = buyer; TradedAsset.buyer = buyer; TradedAsset.date = date;
}
function deposit() public payable returns(bool) {
require(msg.value == TradedAsset.Quantity * TradedAsset.price); DepositEv(msg.value,msg.sender);
return true;
}
modifier onlyhedger() { require(msg.sender == hedger);
_;
}
function sellcontract(address newhedger) public onlyhedger returns(bool){
hedger = newhedger; return true;
}
function getpaid() public returns(bool){
require(now >= TradedAsset.date && address(this).balance > 0); speculator.transfer(address(this).balance);
return true;
}
}
This is the shortened version of a futures smart contract code. I assume you're now familiar with the Solidity language and you can develop the code for adding advanced features.
As you can see, the starting point is to define a constructor that will determine the contract's details, namely: asset ID, agreed quantity to buy, unit price, buyer's address, seller's address, and delivery date.
We'll also define a few functions:
- deposit(): The hedger (airlines) will call this function to deposit the agreed funds.
- sellcontract(): The speculator can sell the contract to another investor. getpaid(): The contract will release the funds to the oil vendor at the delivery date.
- onlyhedger(): This is a modifier that restricts actions to the initial buyer (the hedger).
Blockchain oracles
At this level, the previous contract enables basic operations to lock and unlock funds against commodities delivery. Nevertheless, once the contract expires, we want the contract to calculate the offset benefit (savings) or loss made by the futures deal – in other words, how much the hedger has economized or lost.
In this case, at settlement time, the smart contract needs a solid and reliable source of information to determine the underlying commodity (oil) price to calculate the offset. But a question arises here: is the contract able to know by itself what the oil market price is?
As we introduced in a previous recipe, the smart contract is deterministic code executed in an isolated VM without direct connection to an outside source of information!
However, there is a workaround for that situation: oracles.
Oracles are trusted agents or data suppliers that read and send requested information to the smart contract from reliable external data sources. We have a few providers of this type of service in the blockchain space, such as Chainlink, Link, Blocksense, and Oraclize. In our example, we will use Oraclize (http://www.oraclize.it/) as it is an industry leader in oracle servicing.
Let's see how we can connect our contract to an oracle contract. In our previous code, we have to bring in the following changes:
pragma solidity ^0.4.24;
import "./oraclizeAPI_0.5.sol"; contract CFutures is usingOraclize {
uint public fuelPriceUSD;
event NewOraclizeQuery(string description); event NewDieselPrice(string price);
function CFutures( uint assetID, uint Quantity, uint price, address buyer, address seller,
uint date) public {
… // keep it as defined previously
}
function callback(bytes32 myid, string result) public { require(msg.sender == oraclize_cbAddress()); NewDieselPrice(result);
fuelPriceUSD = parseInt(result, 2);
}
function updateprice() public payable {
NewOraclizeQuery("Oraclize query was sent, standing by for the answer.."); oraclize_query("URL","xml(https://www.fueleconomy.gov/ws/rest/fuelprices).f uelPrices.diesel");
}
}
In result we end up with a simple contract using the Oraclize service to request Fuelprice
(let's consider fuel as equivalent to oil).
As you can see, we start by importing the Oraclize API: import "./oraclizeAPI_0.5.sol";.
Then, we inherit the usingOraclize contract to access the library methods.
Next, to help the compiler resolve the import, we need to download the Oraclize API contract and libraries into Truffle's contracts/ folder by running wget https://raw.githubusercontent.com/oraclize/ethereum-api/master/oraclize API_0.5.sol.
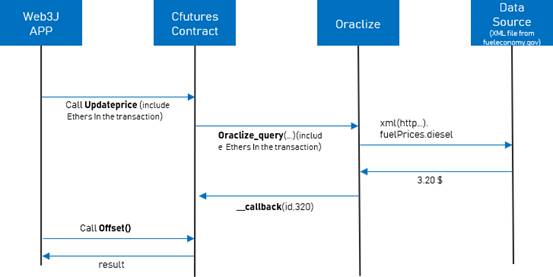
In the Oracle code part, we defined, along with fuelPriceUSD, two new functions: updateprice() and callback.
The first one uses oraclize_query to send a query to the Oraclize's smart contract with two arguments: the type of request (URL, WolframAlpha, IPFS multihash) and the requested information (a specific property in the XML response). The updateprice function is declared as payable because the Oraclize service isn't free, and this function should accept ether to be able to pay for the Oraclize service. However, the first query made by a contract is free, so we include a call for the updateprice() function without sending ether in our constructor.
On the other hand, the second function, callback is defined by the API and, as its name indicates, it's a callback function executed once Oracle sends back the response. Its first parameter is the id of the request, while the second parameter is the result of your request. In this example, we use the parseInt function, which is defined by the Oraclize API file, to set the number precision. In the preceding example, $3.20 will be returned as 320 cents.
The following diagram represents the interaction between the initial contract and the data source using Oraclize:
Lastly, let's implement the offset() method that will calculate the offset profit the hedger made by taking this futures contract based on the price variation:
function offset() public view returns (uint) {
return TradedAsset.Quantity * (fuelPriceUSD - TradedAsset.price);
}
Now that the contract is complete, compile the contract using truffle compile and check whether there are any errors.
Web3j
Web3j is a real treat for Java lovers who want to make their first steps in the new blockchain environment. It represents a lightweight Java and Android API for integration with Ethereum clients. It enables you to build a decentralized Java application easily based on Ethereum. You can find all the details about the project at their official website: https:// web3j.io/.
Prerequisites
To get the most out of the following sections, you need to have a basic knowledge of Java. You should also have the following elements installed to build the application:
- Java 8 JDK
- Eclipse and Maven – for coding and development
Setting up the Web3J Maven project
If you have already downloaded the code from GitHub, you can import it in Eclipse. Otherwise, if you want to build the project from scratch, you have to create a new Maven project, as follows:
- In the Eclipse IDE, navigate to File | New | Other to bring up the project- creation wizard.
- Scroll to the Maven folder, open it, and choose Maven Project. Then choose Next.
- Keep passing the dialogue forms by pressing next until you get the following form:
Here, you will need to enter information regarding the Maven project you are creating. Choose the names you want and press Finish. The following is what your sample project structure will look like at the end of the Maven project-creation process:
Then, in the Maven POM file (pom.xml), we'll need to add the following lines in the corresponding POM tags:
<properties>
<project.build.sourceEncoding>UTF-8</project.build.sourceEncoding>
<maven.compiler.source>1.8</maven.compiler.source>
<maven.compiler.target>1.8</maven.compiler.target>
</properties>
<plugins>
<plugin>
<groupId>org.apache.maven.plugins</groupId>
<artifactId>maven-compiler-plugin</artifactId>
<version>3.7.0</version>
<configuration>
<source>1.8</source>
<target>1.8</target>
</configuration>
</plugin>
</plugins>
<dependency>
<groupId>org.slf4j</groupId>
<artifactId>slf4j-simple</artifactId>
<version>1.7.21</version>
</dependency>
After editing the Maven POM file, we have to update the project to download the necessary dependencies. Right-click on Project, click on Maven, then choose Update Project...:
Installing web3j
Web3j provides a command-line tool distributed as a portable .jar. In a few steps, you can start using the web3j command line, so no installation is required. In your home folder.
run wget
https://github.com/web3j/web3j/releases/download/v3.4.0/web3j-3.4.0.tar
.
Unzip the downloaded TAR file:
tar xvf web3j-3.4.0
Then add the resultant folder to the system's path:
export PATH=$PATH:~/web3j-3.4.0/bin
You're all set. Now, you can create Ethereum accounts or generate wrapper classes for your smart contracts.
Wallet creation
The web3j command-line tools allow us, among other features, to create wallets or send transactions.
To create a new Ethereum account, run web3j wallet create. You'll be asked to provide a password (don't forget it) and then a location where you want to back up your account (wallet JSON file). At the end, you'll get a JSON file with a long name (you can change this) that carries lots of information, including the account address and private key:

Alternatively, instead of using web3j, you can export one of your Testnet accounts created in MetaMask or Geth.
In this project, we will be running our contract in the Testnet, therefore we need to supply test ethers to our freshly created account. To do that, we can use MetaMask to get free ethers and send them to our new account's address. Be careful, you should add 0x and wait until the transaction is confirmed, as shown here:

The account's address is saved inside the wallet's JSON file created earlier, with the address being the last part of the file's name.
Java client
As introduced earlier in this recipe, we are building a simple Java application using web3j. Let's understand briefly the mechanics behind this API.
Web3j is the Java port of Ethereum's web3 API, which manages communication (JSON- RPC) between Ethereum clients and the network. For each smart contract, web3j generates a wrapper class, simplifying the access and smart contract interaction with Ethereum. Thus, all complexities will be hidden and you will not be forced to initiate RPC calls on your own. The following diagram (from the official documentation) depicts the interaction flow between web3j and Ethereum:
The wrapper generator
Before using web3j, we need to build the Java wrapper class for our smart contract. The web3j command-line tool supports the autogeneration of Java smart contract function wrappers directly from Truffle's contract schema, as follows:
web3j truffle generate ~/FuturesWeb3j/build/contracts/CFutures.json -o
~/eclipse-workspace/futures/src/main/java/ -p org.recipe6.futures
The first argument is the build file compiled by Truffle for the CFutures contract, and the second is the path of your Java project destination where the class wrapper will be generated. In addition, the -p parameter should be the Java packaging structure for the generated class:

This will result in creating a CFutures.java file with a new class with the same name as the smart contract:
public class CFutures extends Contract {
private static final String BINARY = "0x60606040523415600e576...";
}
As you can see, the BINARY string represents your compiled contract (bytecode). Remove the \ and \n, if there are any. You'll find in this class a Java implementation for all of your smart contract methods.
Remember that if you make any changes, you'll have to compile the smart contract and then generate the new ABI, bytecode, and web3j wrapper as we did previously.
Now that we have our smart contract class wrapper, let's move on and write our Futures main class. We have to write a Java class that deploys and interacts with the Cfutures smart contract using the Futures class wrapper.
Initializing web3j
Let's now focus on the App.java file created in the Maven project.
The first step is to initialize a web3j object. We do that by passing in a provider (for example, the endpoint of a third-party or local Ethereum node) to the web3j build function:
Web3j web3j = Web3j.build(new HttpService("https://ropsten.infura.io"));
In this example, we will use the Infura gateway (https://infura.io/) to access the Testnet network. If you remember, in Ethereum, we always need an entry point, which is an RPC/HTTP provider (node) that carries the orders or actions dispatched by the user to the network. Normally, the end user should have a local RPC client connected to the network. However, we directly use an online provider (used also by MetaMask) to avoid needless instructions and to keep communication with the oracle straightforward.
Remember that if you want to use a private network instead, you'll need to use the Ethereum-Bridge API (https://github.com/oraclize/ethereum-bridge) to keep using the Oraclize service.
Setting up Ethereum accounts
To interact with the blockchain network, we need to build transactions, thus we need to have a wallet. We can use an existing one, as follows:
Credentials credentials = WalletUtils.loadCredentials("PASSWORD", "/path/to/walletfile.json");
Or, we can create a new wallet: WalletUtils.generateNewWalletFile("PASSWORD", new File("/path/to/destination"), true);.
Once loaded or created, you can check the current balance of your wallet using the following:
EthGetBalance AccountBalance = web3j.ethGetBalance(credentials.getAddress(),
DefaultBlockParameterName.LATEST).sendAsync().get(); log.info("The accounts balance " + AccountBalance);
Deploying the contract
As the wallet credentials are defined and the web3 is initialized, we can construct and deploy our Cfutures contract using the deploy method:
CFutures CFuture_ = CFutures.deploy(web3j, credentials, CUSTOM_GAS_PRICE, GAS_LIMIT, assetID,
Quantity, price, buyer, seller, date).send();
The first four arguments are needed to construct the deployment transaction, while the rest are the arguments needed by the contract's constructor.
Among these four parameters, we need to define the gas limit and the gas price. In this example, I have defined them as global variables, as follows:
private static final BigInteger GAS_LIMIT = BigInteger.valueOf(4_700_000); private static final BigInteger CUSTOM_GAS_PRICE = Convert.toWei("140",
Convert.Unit.GWEI).toBigInteger();
Here, we define a gas limit of 47,00,000 units of gas and a gas price of 140 GWei. Web3j uses a default price of 22 GWei – feel free to define your own values. To choose the right value, you can check the current gas price for Ropsten at https://ropsten.etherscan.io/chart/gasprice.
Once the deploy() function is executed, it will result in creating a new instance of the CFutures smart contract on the Ethereum blockchain using the supplied credentials and constructor parameter values. If, for any reason, the deployment transaction isn't validated within 600 seconds, an exception will be raised.
At any time, you can visit the Ropsten explorer to examine whether the contract has been deployed using the link printed by the log here:
String CFuturesAddress=CFuture_.getContractAddress(); log.info("View contract at https://ropsten.etherscan.io/address/" + CFuturesAddress);
Interacting with smart contracts
If you wish to construct an instance of a smart contract wrapper with an existing smart contract, simply pass in its address to the predefined load function:
CFutures CFutureInstance = CFutures.load("contract_address", web3j, credentials,
CUSTOM_GAS_PRICE, GAS_LIMIT);
Once you instantiate a new CFuture object (using deploy or load), Eclipse will help you with the autocompletion feature to choose the functions to call or to access contract proprieties:
Calling a contract function
In our example, once the contract is loaded for the first time, we need to deposit the amount both parties agreed on. Hence, we need to execute the deposit function along with sending the contract value in ethers.
In web3j, all methods are defined identically to their equivalent Solidity methods and take the same parameters. To transact with a Cfutures function, we invoke the equivalent object's method using dot notation, as follows:
BigInteger Quantity = BigInteger.valueOf(120000); BigInteger Price = BigInteger.valueOf(300);
TransactionReceipt DepositReceipt = CFutureInstance.deposit(Price.multiply(Quantity)).send();
As you can see, the argument passed to the deposit function is a BigInteger (price * quantity), not an integer or int, and so all variables should be declared as BigInteger in web3j.
For the sake of preserving our testing ethers, we will make a deposit in wei and we will assume that a wei is worth a cent (I know it's unrealistic). We suppose here that at the agreement time, an oil gallon costs 300 cents (300 wei). The quantity and price are declared as separated variables.
If you look at the wrapper class in CFutures.java, you'll find a defined Java function for each function defined in the smart contract. For instance, you'll find the following:
public RemoteCall<TransactionReceipt> deposit(BigInteger weiValue) {
…
return executeRemoteCallTransaction(function, weiValue);
}
You can see that the function definition has changed, as the original doesn't accept any parameters:
deposit() payable returns(bool) {}
Web3j defines this new argument for payable functions to make it possible to pass in the amount of Wei to send.
It's worth noting that, as stated in the official documentation (https://web3j. readthedocs.io/en/latest/smart_contracts.html), transactional calls do not return any values, regardless of the return type specified on the method. Hence, for all transactional methods, the transaction receipt (https://github.com/ethereum/wiki/wiki/JSON- RPC#eth_gettransactionreceipt) associated with the transaction is returned.
The transaction receipt is useful for two reasons:
- It provides details of the mined block that the transaction resides in
- Solidity events that are called will be logged as part of the transaction, which can then be extracted
For example, we can get from the transaction receipt the transaction hash and examine the corresponding transaction on Etherscan as shown in the picture below:
Calling view methods
For view methods (which only read a value in a smart contract), they are invoked using an ordinary method call, except they will not return a TransactionReceipt as no transaction will be initiated (no cost associated). In our smart contract, we have a view
method, offset(), that can be invoked as follows:
BigInteger Offset=CFutureInstance.offset().send(); log.info("your offset is "+Offset.intValue());
In the same manner, it is possible to query the public states of a smart contract, for instance to read the last fuelPriceUSD state's value:
BigInteger LastfuelPrice = CFutureInstance.fuelPriceUSD().send(); Integer fuelPriceUSD = LastfuelPrice.intValue();
log.info("Last fuel Price Fuel price According to the Oracle is: " + fuelPriceUSD);
But, to update the fuelPriceUSD to the current price, we need to go through two steps.
The first is to update the price, which we request from the oracle. The second is to wait for the event informing us of the oracle's response to read the new value:
BigInteger txcost = Convert.toWei("0.01", Convert.Unit.ETHER).toBigInteger(); TransactionReceipt UpdateReceipt = CFutureInstance.updateprice(txcost).send();
for (CFutures.NewDieselPriceEventResponse event : CFutureInstance.getNewDieselPriceEvents(UpdateReceipt)) {
log.info("The oil price has been updated:" + event.price);
}
Keep in mind, when you call the oracle, you are initiating an asynchronous exchange, which means there will be a delay between the query and the response (request and a callback transaction). Thus, in our Java code, we will need to update the price by listening for the NewDieselPrice event before calling the offset() method to give us an accurate value.
Notice that we used Convert.toWei("0.01", Convert.Unit.ETHER) to convert from ethers to wei while calling updateprice(), to cover the call charges.
Web3j events
In the smart contract, we have defined a few events. Each one will be represented in the smart contract wrapper with a method named identically, which takes the transaction receipt and returns a decoded result (event parameters) in an instance of the
EventValues object. Given that, here's how to get the event data and display its content in our console:
for (CFutures.DepositEvEventResponse event : CFutureInstance.getDepositEvEvents(DepositReceipt)) {
log.info("Depoist event detected:" + event.amount+"wei has been deposited");
log.info("The funds has been sent by: " + event.sender);
}
Alternatively, you can use Observables (RxJava's observables), which will listen for events associated with the smart contract. Then use an EthFilter object to filter your observable, as follows:
EthFilter filter = new EthFilter(DefaultBlockParameterName.EARLIEST, DefaultBlockParameterName.LATEST,
CFutureInstance.getContractAddress()); web3j.ethLogObservable(filter).subscribe(Clog -> {
log.info("contract log"+ Clog.toString());
});
For EthFilter, we specify the topics that we wish to apply to the filter, including the contract address. We can also provide specific topics (only for indexed Solidity event parameters) to filter using: filter.addSingleTopic(EventEncoder.encode(event));
At the time of writing, listening for events (filters/subscriptions) is supported by Infura only using websocket endpoints on mainnet, Ropsten, and Rinkeby. However, web3j doesn't yet support websockets, so we can't use filters in web3j while using Infura.
This was the last web3J feature we needed to cover in this recipe – it's time to test the code by importing and running the project in Eclipse.
Enhancement
The last thing to consider is adding a textual or a graphical menu to this application to help the user make their choices. To avoid bloating the project with irrelevant code to our purpose, I have opted for a simple text-based menu:
input = new Scanner(System.in); CFutures CFutureInstance = null;
System.out.println("Please make your choice:"); System.out.println("1 – Deploy New Cfutures contract."); System.out.println("2 – Load contract"); System.out.println("3 – Make deposit"); System.out.println("4 – current Fuel price"); System.out.println("5 – Update Fuel price"); System.out.println("6 – Investment offset"); System.out.println("0 - exit");
int selection;
choice: while(input.hasNextInt()) {
selection = input.nextInt(); switch (selection) {
case 0:
break choice;
…
}
}
Great, now run your APP.java file to check whether everything is working as expected. You should see message logs detailing the execution steps, similar to the following:

You might get the event results in arbitrary order, as they are executed asynchronously in parallel and their results are later captured. Therefore, it would be preferable to use a CompletableFuture class to wrap your web3j methods and handle these asynchronous calls.
Conclusion
In this recipe, we have scratched the surface of working with the Ethereum blockchain using your beloved language, Java. Indeed, it was a gentle introduction to web3j by building an Oracle-based application, opening the door to build complex Ethereum applications in Java. From now on, all you need is to dive deep into the web3j documentation. You will find a number of smart contract examples in their main project repository (https://github.com/web3j/web3j/tree/master/codegen/src/test/ resources/solidity).
To enrich your knowledge, you can also explore EthereumJ, which is a Java implementation of the Ethereum protocol, or Ethereum Harmony. To step outside of the Java world, you can explore Web3py (https://github.com/ethereum/web3.py), which is a complete Python implementation of web3js.
If you like to explore blockchain development with an alternative platform like Hyperledger or learn about the projects of Hyperledger like Sawtooth or Iroha, visit Comprehensive Hyperledger Training Tutorials page to get the outline of our Hyperledger articles.
To conclude this recipe, we like to recommend Blockchain Hyperledger Development in 30 hours, Learn Hands-on Blockchain Ethereum Development & Get Certified in 30 Hrs, and Become Blockchain Certified Security Architect in 30 hours courses to those interested in pursuing a blockchain development career. This recipe is written by Brian Wu who is our senior Blockchain instructor & consultant in Washington DC. His books (Blockchain By Example and Hyperledger Cookbook) are highly recommended for learning more about blockchain development.
Related Training Courses
Hands-on Node.JS, MongoDB and Express.js Training
Advance JavaScript, jQuery Using JSON and Ajax
Learn Hands-on Blockchain Ethereum Development & Get Certified in 30 Hrs
Learn Blockchain Hyperledger Development & Get Certified in 30 Hrs
Become Blockchain Certified Security Architect in 30 hours
Blockchain Certified Solution Architect in 30 hours
Introduction to Python Programming
Object Oriented Programming with UML