Work with Ethereum Private Network with Golang and Geth
Recipe ID: hsts-r35
Self-paced training
We offer blockchain introduction, Hyperledger for system admin, Ethereum, Solidity, Corda R3, Hyperledger for developers, blockchain cybersecurity and more classes in self-paced video format starting at $60. Click here to learn more and register. For complete self-paced blockchain training, visit our Complete Blockchain Development Training page.
Update on Feb 2021
The latest version of this tutorial along with all updated source codes is available via the below link:
https://myhsts.org/blog/ethereum-dapp-with-evm-remix-golang-truffle-and-solidity-part1.html
Recipe Overview
Ethereum is a general-purpose blockchain that is more suited to describing business logic, through advanced scripts, also known as smart contracts. Ethereum was designed with a broader vision, as a decentralized or world computer that attempts to marry the power of the blockchain, as a trust machine, with a Turing-complete contract engine. Although Ethereum borrows many ideas that were initially introduced by bitcoin, there are many divergences between the two.
The Ethereum virtual machine and smart contracts are key elements of Ethereum, and constitute its main attraction. In Ethereum, smart contracts represent a piece of code written in a high-level language (Solidity, LLL, Viper) and stored as bytecode in the blockchain, in order to run reliably in a stack-based virtual machine (Ethereum Virtual Machine), in each node, once invoked. The interactions with smart contract functions happen through transactions on the blockchain network, with their payloads being executed in the Ethereum virtual machine, and the shared blockchain state being updated accordingly.
For those who are not familiar with blockchain technology reading History and Evolution of Blockchain Technology from Bitcoin article is strongly recommended. Also, if you wish to learn and practice Hyperledger blockchain development, visit Comprehensive Hyperledger Training Tutorials page to get the outline of our Hyperledger tutorial articles.
We have written two sets of tutorials to explore Ethereum and Solidity programming in depth. First set covers the following nine recipes:
- Introduction to Ethereum Blockchain Development with DApps and Ethereum VM
- Building Auction DApp With Ethereum and Solidity Programming Language
- Working with Ethereum Blockchain Applications through Remix IDE
- Building Bidding Form in Web3js for Ethereum Auction DApp
- Working with web3js API and JSON to Build Ethereum Blockchain Applications
- Deployment Environments for Managing Ethereum Smart Contracts
- Work with Ethereum Private Network with Golang with Geth
- Compiling and Deploying Ethereum Contracts Using Solidity Compiler
- Running Ethereum Auction DApp and Solidity Tips
In short, you learn about how to set up and configure Ethereum and develop blockchain applications using Solidity programming language. We explore its key components, including smart contracts and Web3.JS API via an Auction Decentralized Application (DApp) step-by-step.
In second set, we will discuss more advance topics in Ethereum blockchain development and solidity while building a Tontine DApp game step-by-step. Specifically, we cover Truffle and Drizzle. For instance, we show you how a tool such as Truffle can be an assistant in building, testing, debugging, and deploying DApps. In summary, we are going to cover four main topics:
- Exploring the Truffle suite
- Learning Solidity's advanced features
- Contract testing and debugging
- Building a user interface using Drizzle
The 2nd set consists of 8 recipes as follows:
- Install Truffle and Setup Ganache for Compiling Ethereum Smart Contracts for Tontine DApp Game
- Run Tontine Ethereum DApp Game Contract
- Design Tontine Ethereum DApp Game Interfaces
- Contract Interactions between Ethereum and Solidity via Tontine DApp Game
- Work with Truffle Unit Testing in Tontine DApp Game
- Debugging with Truffle and Ethereum Remix in Tontine DApp Game
- Building Frontend Application for Tontine DApp Game with Drizzle
- Running and Playing Tontine Ethereum DApp Game
IMPORTANT: Understanding and completing the first set of recipes are required prior to working on second set of recipes.
To start, you wil need to install an Ethereum client, for example Geth (Golang Ethereum client). You'll find the instructions to install Geth for your operating system on the Ethereum repository on GitHub (https://github.com/ethereum/go-ethereum/wiki/Installing-Geth). For Ubuntu, you can install the Geth client using the following command:
sudo add-apt-repository -y ppa:ethereum/ethereum sudo apt-get update
sudo apt-get install ethereum
For this local network, we will be running two nodes (on the same machine), therefore we need to create two different folders to host their blockchain copies and wallets. Create a directory called Mytestnet with the following two subdirectories:
~/Mytestnet
|-- nodeA
|-- nodeB
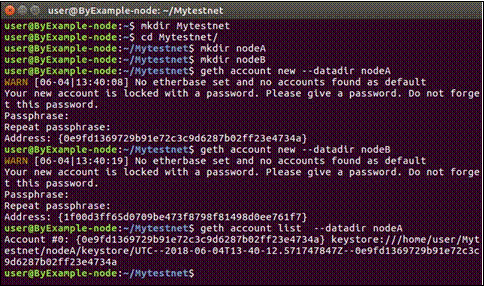
Creating new accounts
We will create new accounts for our new network. Note that an account is not tied to any specific chain, it's just a private/public key pair.
Change directory to the newly created folder Mytestnet and run the following commands:
geth account new --datadir nodeA geth account new --datadir nodeB
Repeat the same command to get different accounts on both nodes that we will use to interact with the contract as bidders. Geth will print out the address for each user, so think of saving these addresses in a file, in order to use them later.
You can list the created account for node A or B by using geth account list -- datadir nodeA/nodeB:
Genesis file
As you know, each blockchain starts with a genesis block and keeps building on top of it. Therefore, before running your private network, you first have to prepare your own genesis block by defining a genesis file.
You can easily create new genesis files with a command-line tool called puppeth, which is a private blockchain manager that comes as a utility with Ggeth. Run puppeth and follow the configuration wizard. You'll need to answer a few questions as shown in the following screenshot:
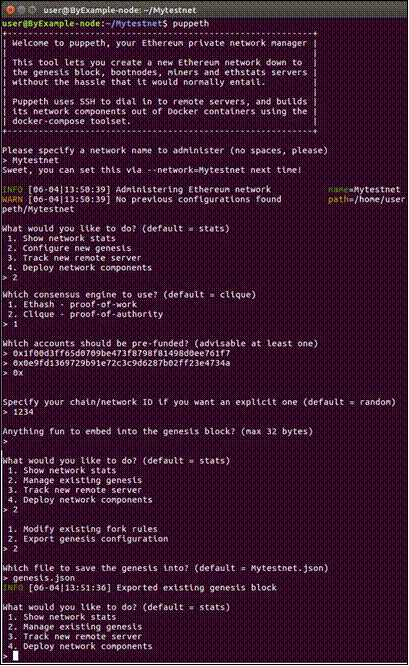
When it asks you about accounts to pre-fund, give it the addresses that were created earlier. At the end of the process, save the genesis file as a JSON file, genesis.json:

Node initialization
Now that we have the genesis.json file, let's forge the genesis block. Both nodes should initialize their chain using the same genesis file by running the following commands:
geth --datadir nodeA init genesis.json geth --datadir nodeB init genesis.json
All set. Now you can start your new chain on both nodes using two Terminals. Starting node A as follows:
geth --datadir nodeA --networkid 1234 --rpc --rpcport 8545 --port 8888 -- rpcapi “db,eth,net,web3,personal,miner,admin” --cache=128 --rpcaddr 0.0.0.0
--rpccorsdomain "*" console
And it's the same for node B (update parameters specific to the node):
geth --datadir nodeB --networkid 1234 --rpc --rpcport 9545 --port 9999 -
-rpcapi “db,eth,net,web3,personal,miner,admin” --cache=128 --rpcaddr
--rpccorsdomain "*" console
Running Geth with the --rpc argument makes it operate as an HTTP JSON-RPC server. We have chosen different ports because, in this example, both nodes are running on the same physical machine. The following lists the meaning of some specified arguments, and you can refer to the official documentation for the others:
- id: Network identifier. You can pick any value you want but avoid an ID of 0 to 3 as they are reserved.
- rpcaddr: Specifies the HTTP-RPC server listening address (default: “localhost”).
- rpcport: Specifies the HTTP-RPC server listening port (default: 8545). rpcapi: Specifies the APIs offered over the HTTP-RPC interface (default: eth, net, web3).
- rpccorsdomain: Domains from which Geth accepts cross origin requests (browser enforced).
To connect both nodes, you can use any distinct, unused ports but you should set the same network ID. Be aware that the JSON RPC server is not recommended to be used over public internet, but only as a local interface:

Connecting Ethereum nodes
As we have enabled the console mode in each node, we can execute commands provided by Geth. Therefore, to connect both nodes, we need to first get the node URL
using admin.nodeInfo.enode.
As a result, you'll get a value uniquely identifying your node, which can be used by another node to connect both nodes:
admin.addPeer({"enode://7649de56ad54a0e6c712bb31db….32a789b9e@[::]:9999"})
Replace [::] with the node's IP address if you are using nodes in a network.
If everything went well, the net.peerCount command should return 1 in both consoles and admin.peers should return the list of currently connected peers.
It's worth noting that, for security reasons, Geth unlocks the accounts to prevent anyone other than the owner from performing any action or moving its funds. Therefore, you have to unlock an account before you start sending a transaction using the following:
web3.personal.unlockAccount("account address", "password", 0);
As account address, you can provide an address from those you got earlier, or just use eth.coinbase, which refers to the first account (in Ethereum, a single wallet can have many accounts, each having its own address). The second parameter is the password you provided when you created your account, and the last argument is the duration of unlocking. Having zero as a value means that the account will be unlocked until Geth stops running.
RPC tests
You can communicate with your nodes over RPC (outside of the Geth Terminal) to execute methods defined in web3 API. For instance, we can use CURL or some other command-line HTTP-fetching utility to request Geth's version over RPC as follows:
curl -X POST --data '{"jsonrpc":"2.0","method":"web3_clientVersion","params":[],"id":67}' -H 'content-type: text/plain;' http://127.0.0.1:8545/
{"jsonrpc":"2.0","id":67,"result":"Geth/v1.7.2-stable-1db4ecdc/linux- amd64/go1.9"}}
Mining process
As in other blockchains, to validate a transaction, whether it is intended to deploy or to interact with the contract, we need to have it mined and included in a block. To start mining with Geth, you'll need to run the following command in the geth console:
miner.start(x)
Here, x is an optional parameter representing the number of miner threads. This command will start the mining process, which will keep running even if there are no transactions to validate, creating empty blocks until you stop it manually using miner.stop(). The good news is that the mining process will generate new ether for you (valueless, of course).
A more convenient way would be to automatize the process of starting and stopping the mining process only when it's needed (when there are pending transactions). For this purpose, we need to first create a JavaScript file named mining.js, in which we define the following script:
var mining_threads = 1; function check() {
if (eth.getBlock("pending").transactions.length > 0) { if (eth.mining) {
return;
}
console.log("Mining in progress..."); miner.start(mining_threads);
} else {
miner.stop(0); console.log("Mining stopped.");
}
}
eth.filter("latest", function(err, block) { check();
});
eth.filter("pending", function(err, block) { check();
});
check();
Then load this script in the geth Terminal using
loadScript("/file_path/mining.js").
Contract deployment
Now your local Ethereum network is ready to process your transactions and to host your smart contract. Don't forget to make sure you unlocked your account and to mine a few blocks to get some ether.
In the Remix environment, you have to specify one of your node's IP address and RPC port will as the web3 provider. Thereafter, deploy your contract and edit your auction.js file with your new contract's address.
Congratulations! You have finished deploying the contract and you can start auctioning from the web page. In our next recipe, we will show you how to use Solidity compiler to deploy Ethereum contracts.
To conclude this recipe, we like to recommend our Learn Hands-on Blockchain Ethereum Development & Get Certified in 30 Hrs, and Become Blockchain Certified Security Architect in 30 hours courses to those interested in pursuing a blockchain development career. This recipe is written by Brian Wu who is our senior Blockchain instructor in Washington DC. His Blockchain By Example book is highly recommended for learning more about blockchain development.
Related Training Courses
Hands-on Node.JS, MongoDB and Express.js Training
Advance JavaScript, jQuery Using JSON and Ajax
Learn Hands-on Blockchain Ethereum Development & Get Certified in 30 Hrs
Learn Blockchain Hyperledger Development & Get Certified in 30 Hrs
Become Blockchain Certified Security Architect in 30 hours
Blockchain Certified Solution Architect in 30 hours
Introduction to Python Programming
Object Oriented Programming with UML
Private and Custom Coding Classes
We offer private coding classes for beginners online and offline (at our Virginia site) with custom curriculum for most of our classes for $59 per hour online or $95 per hour in virginia. Give us a call or submit our Private Coding Classes for Beginners form to discuss your needs.