Customer Management App Using Nest.JS, MongoDB & Vue.js
Recipe ID: hsts-r4
Self-paced training
We offer HTML5, CSS3, JavaScript,Bootstrap, Angular.JS, WordPress Node.JS, React.JS, Joomla, Drupal, Vue.JS and more classes in self-paced video format starting at $60. Click here to learn more and register. For complete self-paced web design training, visit our Web design and development bundle page.
Download source files for this recipe
Overview
Nest.js introduces a modern way of building Node.js apps by giving it a proper and modular structure out of the box. It was fully built with TypeScript but still preserves compatibility with plain JavaScript.
In this recipe, we will introduce and explain the fundamental steps to follow in order to combine this awesome framework with a modern frontend JavaScript framework such as Vue.js. You will build a web application to manage customers information. The application will be used to create a new customer, add several details about the customer and update each customer's records in the database.
The approach to this post will be to build a separate REST API backend with Nest.js and a frontend to consume this API using Vue.js. So basically, instead of building Nest.js application that uses a Node.js template engine for the client side, you will leverage on the awesomeness of Vue.js as a progressive JavaScript library to quickly render contents and handled every client-side related logic.
In addition, you will use MongoDB database to persist and retrieve data for the application. MongoDB is a schema-less NoSQL document database that can receive and store data in JSON document format. It is often use with Mongoose; an Object Data Modeling (ODM) library, that helps to manage relationships between data and provides schema validations.
Prerequisites
- A reasonable knowledge of building applications with JavaScript is required and a basic knowledge of TypeScript will be an added advantage.
- Ensure that you have Node and npm installed on your local system.
- Install MongoDB on your local system.
- A text editor installed, such as Visual Studio Code, Atom, or Sublime Text
Learning Objective
- You will be conversant and comfortable using Nest.js and Vue.js
- You will be comfortable using MongoDB
We will use Nest.js to develop the backend API and then a Vue.js application to build components for creating, editing, deleting and showing the total list of customers from a mongoDB database.
Step By Step
Installing Nest.js and its dependencies
Now that the basic introductory contents have been properly covered, you will proceed to installing Nest.js and its required dependencies. Getting Nest.js installed can be done in two different ways:
- Scaffold the base project with Nest CLI tool
- Installing the starter project on GitHub by using Git
You will use the Nest CLI here in this recipe to easily craft a new Nest.js project. This comes with a lot of benefits like scaffolding a new project seamlessly, generating different files by using the nest command amongst other things.
First, you need to install the CLI globally on your system. To do that, run the following command from the terminal:
npm install -g @nestjs/cli
The installation of this tool will give you access to the nest command to manage the project and create Nest.js application related files as you will see later in this post.
Now that you have the CLI installed, you can now proceed to create the project for this tutorial by running the following command from your local development folder:
nest new customer-list-app-backend
The preceding command will generate a customer-list-app-backend application. Next, change directory into this new project and install the only server dependency for the backend. As mentioned earlier, you will use MongoDB database to persist data for the application. To integrate it with a Nest.js project, you need to install mongoose and the mongoose package built by the Nest.js team. Use the following command for this purpose:
cd customer-list-app-backend
npm install --save @nestjs/mongoose mongoose
Start the application
With the installation process properly covered, you can now start the application with:
npm run start
This will start the application on the default port of 3000. Navigate to http://localhost:3000 from your favorite browser and you should have a page similar to this:

Connecting with MongoDB database
It is assumed that by now, you have installed MongoDB on your machine as instructed at the beginning of this post. To start the database, open a new terminal so that the application keeps running and run sudo mongod . The preceding command will start the MongoDB service and simultaneously run the database in the background.
Next, to quickly setup a connection to the database from your application, you will have to import the installed MongooseModule within the root ApplicationModule. To do this, use your preferred code editor to open the project and locate ./src/app.module.ts. Update the contents with the following:
// ./src/app.module.ts
import { Module } from '@nestjs/common';
import { AppController } from './app.controller';
import { AppService } from './app.service';
import { MongooseModule } from '@nestjs/mongoose';
@Module({
imports: [
MongooseModule.forRoot('mongodb://localhost/customer-app', { useNewUrlParser: true })
],
controllers: [AppController],
providers: [AppService],
})
export class AppModule {}
Here, Mongoose module for MongoDB uses the forRoot() method to supply the connection to the database.
Setting up and configuring a database schema, interfaces and DTO
To properly structure the kind of data that will be stored in the database for this application, you will create a database schema, a TypeScript and a data transfer object (DTO).
Database schema
Here, you will create a mongoose database schema that will determine the data that should be stored in the database. To begin, navigate to the ./src/ folder and first, create a new folder named customer and within the newly created folder, create another one and call it schemas. Now create a new file within the schemas and named customer.schema.ts . Open this newly created file and paste the following code in it:
// ./src/customer/schemas/customer.schema.ts
import * as mongoose from 'mongoose';
export const CustomerSchema = new mongoose.Schema({
first_name: String,
last_name: String,
email: String,
phone: String,
address: String,
description: String,
created_at: { type: Date, default: Date.now }
})
This will ensure that data with string value will be stored in the database.
Interfaces
Next, you will create a TypeScript interface which will be used for type-checking and to determine the type of values that will be received by the application. To set it up, create a new folder named interfaces within the ./src/customer folder. After that, create a new file within the newly created folder and name it customer.interface.ts . Paste the following code in it :
// ./src/customer/interfaces/customer.interface.ts
import { Document } from 'mongoose';
export interface Customer extends Document {
readonly first_name: string;
readonly last_name: string;
readonly email: string;
readonly phone: string;
readonly address: string;
readonly description: string;
readonly created_at: Date;
}
Data transfer object (DTO)
A data transfer object will define how data will be sent on over the network. To do this, create a folder dto inside ./src/customer folder and create a new file create-customer.dto.ts and paste the code below in it:
// ./src/customer/dto/create-customer.dto.ts
export class CreateCustomerDTO {
readonly first_name: string;
readonly last_name: string;
readonly email: string;
readonly phone: string;
readonly address: string;
readonly description: string;
readonly created_at: Date;
}
You are now done with the basic configurations of connecting and interacting with the database
Creating module, controller and service for the application
Generate modules
A module in Nest.js is identified by the @Module() decorator and it takes in objects such as controllers and providers. Here you will leverage on the nest command to easily generate a new module for the customer app. This will ensure that the application is properly structured and more organized. Stop the application, if it is currently running with CTRL + C and run the following command
nest generate module customer
This will create a new file named customer.module.ts within the src/customer folder and update the root module (i.e app.module.ts) of the application with the details of the newly created module.
// ./src/customer/customer.module.ts
import { Module } from '@nestjs/common';
@Module({})
export class CustomerModule {}
You will come back to add more content to this module later in this post.
Generate service
Service also known as provider in Nest.js basically carry out the task of abstracting logic away from controllers. With it in place, a controller will only carry out the functionality of handling HTTP requests from the frontend and delegate the complex tasks to services. Service or provider in Nest.js is identified by adding @Injectable() decorator on top of them.
Generate a new service using the nest command by running the following command from the terminal within the project directory:
nest generate service customer
After successfully running the command above, two new files will be created. They are:
- customer.service.ts: this is the main service file with @Injectable() decorator
- customer.service.spec.ts: a file for unit testing. You can ignore this file for now as testing will not be covered in this tutorial.
The customer.service.ts file holds all the logic as regards database interaction for creating and updating every details of a new customer. In a nutshell, the service will receive a request from the controller, communicate this to the database and return an appropriate response afterwards.
Open the newly created customer.service.ts file and replace the existing code with the following :
// ./src/customer/customer.service.ts
import { Injectable } from '@nestjs/common';
import { Model } from 'mongoose';
import { InjectModel } from '@nestjs/mongoose';
import { Customer } from './interfaces/customer.interface';
import { CreateCustomerDTO } from './dto/create-customer.dto';
@Injectable()
export class CustomerService {
constructor(@InjectModel('Customer') private readonly customerModel: Model<Customer>) { }
// fetch all customers
async getAllCustomer(): Promise<Customer[]> {
const customers = await this.customerModel.find().exec();
return customers;
}
// Get a single customer
async getCustomer(customerID): Promise<Customer> {
const customer = await this.customerModel.findById(customerID).exec();
return customer;
}
// post a single customer
async addCustomer(createCustomerDTO: CreateCustomerDTO): Promise<Customer> {
const newCustomer = await this.customerModel(createCustomerDTO);
return newCustomer.save();
}
// Edit customer details
async updateCustomer(customerID, createCustomerDTO: CreateCustomerDTO): Promise<Customer> {
const updatedCustomer = await this.customerModel
.findByIdAndUpdate(customerID, createCustomerDTO, { new: true });
return updatedCustomer;
}
// Delete a customer
async deleteCustomer(customerID): Promise<any> {
const deletedCustomer = await this.customerModel.findByIdAndRemove(customerID);
return deletedCustomer;
}
}
Here, you imported the required module from @nestjs/common, mongoose and @nestjs/mongoose. In addition, you also imported the interface created earlier named Customer and a data transfer object CreateCustomerDTO.
In order to be able to seamlessly carry out several database related activities such as, creating a customer, retrieving the list of customers or just a single customer, you used the @InjectModel method to inject the Customer model into the CustomerService class.
Next, you created the following methods:
- getAllCustomer() : to retrieve and return the list of customers from the database
- getCustomer(): it takes customerID as a parameter and based on that, it will search and return the details of a user identified by that ID.
- addCustomer(): used to add a new customer to the database
- updateCustomer(): this method also takes the ID of a customer as an argument and will be used to edit and update the details of such customer in the database.
- deleteCustomer(): this will be used to delete the details of a particular customer completely from the database.
Generate controller
Handling each route within the application is one of the major responsibility of controllers in Nest.js. Similar to most JavaScript server-side framework for the web, several endpoints will be created and any requests sent to such endpoint from the client side will be mapped to a specific method within the controller and an appropriate response will be returned.
Again, you will use the nest command to generate the controller for this application. To achieve that, run the following command:
nest generate controller customer
This command will also generate two new files within the src/customer, they are , customer.controller.spec.ts and customer.controller.ts files respectively. The customer.controller.ts file is the actual controller file and the second one should be ignored for now. Controllers in Nest.js are TypeScript files decorated with @Controllermetadata.
Now open the controller and replace the content with the following code that contains methods to create a new customer, retrieve the details of a particular customer and fetch the list of all customers from the database:
// ./src/customer/customer.controller.ts
import { Controller, Get, Res, HttpStatus, Post, Body, Put, Query, NotFoundException, Delete, Param } from '@nestjs/common';
import { CustomerService } from './customer.service';
import { CreateCustomerDTO } from './dto/create-customer.dto';
@Controller('customer')
export class CustomerController {
constructor(private customerService: CustomerService) { }
// add a customer
@Post('/create')
async addCustomer(@Res() res, @Body() createCustomerDTO: CreateCustomerDTO) {
const customer = await this.customerService.addCustomer(createCustomerDTO);
return res.status(HttpStatus.OK).json({
message: "Customer has been created successfully",
customer
})
}
// Retrieve customers list
@Get('customers')
async getAllCustomer(@Res() res) {
const customers = await this.customerService.getAllCustomer();
return res.status(HttpStatus.OK).json(customers);
}
// Fetch a particular customer using ID
@Get('customer/:customerID')
async getCustomer(@Res() res, @Param('customerID') customerID) {
const customer = await this.customerService.getCustomer(customerID);
if (!customer) throw new NotFoundException('Customer does not exist!');
return res.status(HttpStatus.OK).json(customer);
}
}
In order to interact with the database, the CustomerService was injected into the controller via the class constructor(). The addCustomer() and getAllCustomer()methods will be used to add a new customer’s details and retrieve the list of customers while the getCustomer() receives the customerID as a query parameter and throw an exception if the customer does not exist in the database.
Next, you need to be able to update and delete the details of a customer where and when necessary. For this you will add two more methods to the CustomerControllerclass. Open the file again and add this:
// ./src/customer/customer.controller.ts
...
@Controller('customer')
export class CustomerController {
constructor(private customerService: CustomerService) { }
...
// Update a customer's details
@Put('/update')
async updateCustomer(@Res() res, @Query('customerID') customerID, @Body() createCustomerDTO: CreateCustomerDTO) {
const customer = await this.customerService.updateCustomer(customerID, createCustomerDTO);
if (!customer) throw new NotFoundException('Customer does not exist!');
return res.status(HttpStatus.OK).json({
message: 'Customer has been successfully updated',
customer
});
}
// Delete a customer
@Delete('/delete')
async deleteCustomer(@Res() res, @Query('customerID') customerID) {
const customer = await this.customerService.deleteCustomer(customerID);
if (!customer) throw new NotFoundException('Customer does not exist');
return res.status(HttpStatus.OK).json({
message: 'Customer has been deleted',
customer
})
}
}
Update the customer module
To keep things properly organised go back to the customer.module.ts and set up the Customer model. Update the content with the following:
// ./src/customer/customer.module.ts
import { Module } from '@nestjs/common';
import { CustomerController } from './customer.controller';
import { CustomerService } from './customer.service';
import { MongooseModule } from '@nestjs/mongoose';
import { CustomerSchema } from './schemas/customer.schema';
@Module({
imports: [
MongooseModule.forFeature([{ name: 'Customer', schema: CustomerSchema }])
],
controllers: [CustomerController],
providers: [CustomerService]
})
export class CustomerModule { }
Enable CORS
By default, it is forbidden for two separate application on different ports to interact or share resources with each other unless it is otherwise allowed by one of them, which is often the server-side. In order to allow request from the client side that will be built with Vue.js, you will need to enable CORS (Cross-Origin Resource Sharing).
To do that in Nest.js, you only need to add app.enableCors() to the main.ts file as shown below:
// ./src/main.ts
import { NestFactory } from '@nestjs/core';
import { AppModule } from './app.module';
async function bootstrap() {
const app = await NestFactory.create(AppModule);
app.enableCors(); // add this line
await app.listen(3000);
}
bootstrap();
With this, you have just completed the backend part of the application and can now proceed to build the frontend with Vue.js
Creating the frontend app with Vue.js
The team at Vue.js already created an awesome tool named Vue CLI. It is a standard tool that allows you to quickly generate and install a new Vue.js project with ease. You will use that here to create the frontend part of the customer app, but first you need to install Vue CLI globally on your machine.
Open a new terminal and run:
npm install -g @vue/cli
Once the installation process is complete, you can now use the vue create command to craft a new Vue.js project. Run the following command to do that for this project:
vue create customer-list-app-frontend
Immediately after you hit return, you will be prompted to pick a preset. You can choose manually select features:

Next, check the features you will need for this project by using the up and down arrow key on your keyboard to navigate through the list of features. Press the spacebar to select a feature from the list. Select Babel, Router and Linter / Formatter as shown here:
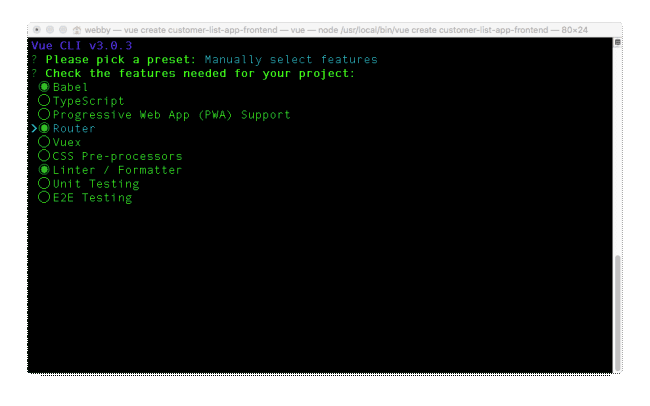
Hitting return here will show you another list of options For other instructions, type y to use history mode for a router, this will ensure that history mode is enabled within the router file that will automatically be generated for this project.
Next, select ESLint with error prevention only in order to pick a linter / formatter config. After that, select Lint on save for additional lint features and save your configuration in a dedicated config file for future projects. Type a name for your preset, I named mine vuescotch:
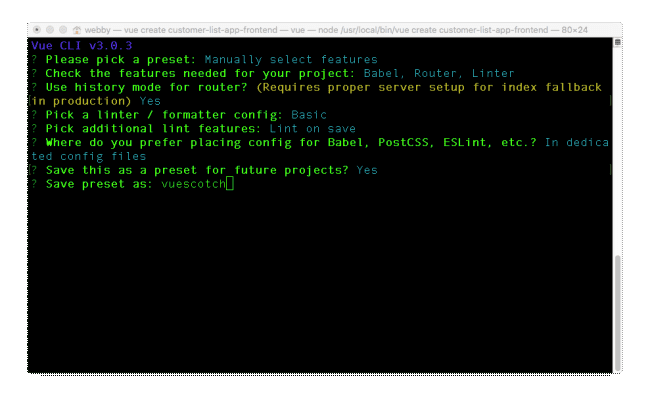
This will create a Vue.js application in a directory named customer-list-app-frontendand install all its required dependencies.
Run the Vue.js app
You can now change directory into the newly created project and start the application with:
// change directory
cd customer-list-app-frontend
// run the application
npm run server
You can now view the application on http://localhost:8080
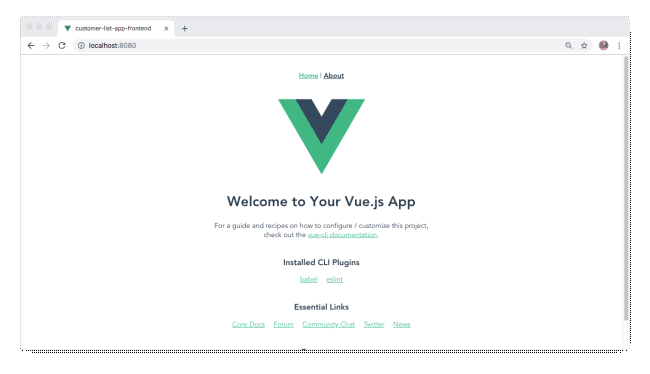
Install axios
Axios, a promised based HTTP client for browser will be used here to perform HTTP requests from different component within the application. Stop the frontend application from running by hitting CTRL + C from the terminal and run the following command afterwards:
npm install axios --save
Once the installation process is completed, open the customer-list-app-frontendwithin a code editor and create a new file named helper.js within the src folder. Open the newly created file and paste the following content in it:
// ./src/helper.js
export const server = {
baseURL: 'http://localhost:3000'
}
What you have done here is to define the `baseURL` for the backend project built with Nest.js. This is just to ensure that you don’t have to start declaring this URL within several Vue.js components that you will create in the next section.
Create reusable components
Vue.js favours building and structuring applications by creating reusable components to give it a proper structure. Vue.js components contains three different sections, which are
- <template></template>
- <script></script>
- <style></style>.
Create customer component
You will start by creating a component within the application for a user to create a customer. This component will contain a form with few input fields required to accepts details of a customer and once the form is submitted, the details from the input fields will be posted to the server. To achieve this, create a new folder named customer within the ./src/components folder. This newly created folder will house all the components for this application. Next, create another file within the customer folder and name it Create.vue. Open this new file and add the following:
// ./src/components/customer/Create.vue
<template>
<div>
<div class="col-md-12 form-wrapper">
<h2> Create Customer </h2>
<form id="create-post-form" @submit.prevent="createCustomer">
<div class="form-group col-md-12">
<label for="title"> First Name </label>
<input type="text" id="first_name" v-model="first_name" name="title" class="form-control" placeholder="Enter firstname">
</div>
<div class="form-group col-md-12">
<label for="title"> Last Name </label>
<input type="text" id="last_name" v-model="last_name" name="title" class="form-control" placeholder="Enter Last name">
</div>
<div class="form-group col-md-12">
<label for="title"> Email </label>
<input type="text" id="email" v-model="email" name="title" class="form-control" placeholder="Enter email">
</div>
<div class="form-group col-md-12">
<label for="title"> Phone </label>
<input type="text" id="phone_number" v-model="phone" name="title" class="form-control" placeholder="Enter Phone number">
</div>
<div class="form-group col-md-12">
<label for="title"> Address </label>
<input type="text" id="address" v-model="address" name="title" class="form-control" placeholder="Enter Address">
</div>
<div class="form-group col-md-12">
<label for="description"> Description </label>
<input type="text" id="description" v-model="description" name="description" class="form-control" placeholder="Enter Description">
</div>
<div class="form-group col-md-4 pull-right">
<button class="btn btn-success" type="submit"> Create Customer </button>
</div> </form>
</div>
</div>
</template>
This is the <template></template> section that contains the details of the input fields. Next, paste the following code just after the end of the </template> tag:
// ./src/components/customer/Create.vue
...
<script>
import axios from "axios";
import { server } from "../../helper";
import router from "../../router";
export default {
data() {
return {
first_name: "",
last_name: "",
email: "",
phone: "",
address: "",
description: ""
};
},
methods: {
createCustomer() {
let customerData = {
first_name: this.first_name,
last_name: this.last_name,
email: this.email,
phone: this.phone,
address: this.address,
description: this.description
};
this.__submitToServer(customerData);
},
__submitToServer(data) {
axios.post(`${server.baseURL}/customer/create`, data).then(data => {
router.push({ name: "home" });
});
}
}
};
</script>
Here, you created a method createCustomer() to receive the details of a customer via the input fields and used axios to post the data to the server.
Edit component
Similar to the CreateCustomer component, you need to create another component to edit customer’s details. Navigate to ./src/components/customer and create a new file named Edit.vue. Paste the following code in it:
// ./src/components/customer/Edit.vue
<template>
<div>
<h4 class="text-center mt-20">
<small>
<button class="btn btn-success" v-on:click="navigate()"> View All Customers </button>
</small>
</h4>
<div class="col-md-12 form-wrapper">
<h2> Edit Customer </h2>
<form id="create-post-form" @submit.prevent="editCustomer">
<div class="form-group col-md-12">
<label for="title"> First Name </label>
<input type="text" id="first_name" v-model="customer.first_name" name="title" class="form-control" placeholder="Enter firstname">
</div>
<div class="form-group col-md-12">
<label for="title"> Last Name </label>
<input type="text" id="last_name" v-model="customer.last_name" name="title" class="form-control" placeholder="Enter Last name">
</div>
<div class="form-group col-md-12">
<label for="title"> Email </label>
<input type="text" id="email" v-model="customer.email" name="title" class="form-control" placeholder="Enter email">
</div>
<div class="form-group col-md-12">
<label for="title"> Phone </label>
<input type="text" id="phone_number" v-model="customer.phone" name="title" class="form-control" placeholder="Enter Phone number">
</div>
<div class="form-group col-md-12">
<label for="title"> Address </label>
<input type="text" id="address" v-model="customer.address" name="title" class="form-control" placeholder="Enter Address">
</div>
<div class="form-group col-md-12">
<label for="description"> Description </label>
<input type="text" id="description" v-model="customer.description" name="description" class="form-control" placeholder="Enter Description">
</div>
<div class="form-group col-md-4 pull-right">
<button class="btn btn-success" type="submit"> Edit Customer </button>
</div> </form>
</div>
</div>
</template>
<script>
import { server } from "../../helper";
import axios from "axios";
import router from "../../router";
export default {
data() {
return {
id: 0,
customer: {}
};
},
created() {
this.id = this.$route.params.id;
this.getCustomer();
},
methods: {
editCustomer() {
let customerData = {
first_name: this.customer.first_name,
last_name: this.customer.last_name,
email: this.customer.email,
phone: this.customer.phone,
address: this.customer.address,
description: this.customer.description
};
axios
.put(
`${server.baseURL}/customer/update?customerID=${this.id}`,
customerData
)
.then(data => {
router.push({ name: "home" });
});
},
getCustomer() {
axios
.get(`${server.baseURL}/customer/customer/${this.id}`)
.then(data => (this.customer = data.data));
},
navigate() {
router.go(-1);
}
}
};
</script>
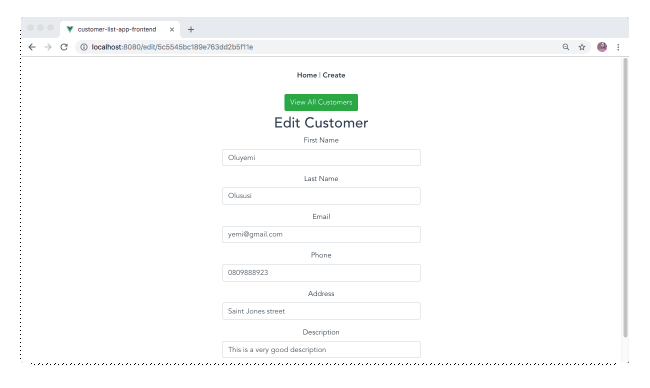
The route parameter was used here to fetch the details of a customer from the database and populated the inputs fields with it. As a user of the application, you can now edit the details and submit back to the server.
The editCustomer() method within the <script></script> was used to send a PUT HTTP request to the server.
View all customer
Finally, to fetch and show the complete list of customers from the server, you will create a new component. Navigate to the views folder within the src folder, you should see a Home.vue file, if otherwise, create it and paste this code in it:
// ./src/views/Home.vue
<template>
<div class="container-fluid">
<div class="text-center">
<h1>Nest Customer List App Tutorial</h1>
<p> Built with Nest.js, Vue.js and MongoDB</p>
<div v-if="customers.length === 0">
<h2> No customer found at the moment </h2>
</div>
</div>
<div class="">
<table class="table table-bordered">
<thead class="thead-dark">
<tr>
<th scope="col">Firstname</th>
<th scope="col">Lastname</th>
<th scope="col">Email</th>
<th scope="col">Phone</th>
<th scope="col">Address</th>
<th scope="col">Description</th>
<th scope="col">Actions</th>
</tr>
</thead>
<tbody>
<tr v-for="customer in customers" :key="customer._id">
<td>{{ customer.first_name }}</td>
<td>{{ customer.last_name }}</td>
<td>{{ customer.email }}</td>
<td>{{ customer.phone }}</td>
<td>{{ customer.address }}</td>
<td>{{ customer.description }}</td>
<td>
<div class="d-flex justify-content-between align-items-center">
<div class="btn-group" style="margin-bottom: 20px;">
<router-link :to="{name: 'Edit', params: {id: customer._id}}" class="btn btn-sm btn-outline-secondary">Edit Customer </router-link>
<button class="btn btn-sm btn-outline-secondary" v-on:click="deleteCustomer(customer._id)">Delete Customer</button>
</div>
</div>
</td>
</tr>
</tbody>
</table>
</div>
</div>
</template>
<script>
import { server } from "../helper";
import axios from "axios";
export default {
data() {
return {
customers: []
};
},
created() {
this.fetchCustomers();
},
methods: {
fetchCustomers() {
axios
.get(`${server.baseURL}/customer/customers`)
.then(data => (this.customers = data.data));
},
deleteCustomer(id) {
axios
.delete(`${server.baseURL}/customer/delete?customerID=${id}`)
.then(data => {
console.log(data);
window.location.reload();
});
}
}
};
</script>
Within <template> section, you created an HTML table to display all customers details and used the <router-link> to create a link for editing and to a view a single customer by passing the customer._id as a query parameter. And finally, within the <script>section of this file, you created a method named fetchCustomers() to fetch all customers from the database and updated the page with the data returned from the server.
Update App.vue
Open the AppComponent of the application and update it with the links to both Homeand Create component by using the content below:
// ./src/App.vue
<template>
<div id="app">
<div id="nav">
<router-link to="/">Home</router-link> |
<router-link to="/create">Create</router-link>
</div>
<router-view/>
</div>
</template>
<style>
...
.form-wrapper {
width: 500px;
margin: 0 auto;
}
</style>
Also included is a <style></style> section to include styling for the forms.
Include Bootstrap
Navigate to the index.html file within the public folder and include the CDN file for bootstrap as shown below. This is just to give the page some default style:
<!DOCTYPE html>
<html lang="en">
<head>
...
<!-- Add this line -->
<link rel="stylesheet" href="https://stackpath.bootstrapcdn.com/bootstrap/4.1.3/css/bootstrap.min.css">
<title>customer-list-app-frontend</title>
</head>
<body>
...
</body>
</html>
Setting up routing
Finally, configure the router file within ./src/router.js to include the link to all the required reusable components created so far by updating its content as shown here:
// ./src/router.js
import Vue from 'vue'
import Router from 'vue-router'
import HomeComponent from '@/views/Home';
import EditComponent from '@/components/customer/Edit';
import CreateComponent from '@/components/customer/Create';
Vue.use(Router)
export default new Router({
mode: 'history',
routes: [
{ path: '/', redirect: { name: 'home' } },
{ path: '/home', name: 'home', component: HomeComponent },
{ path: '/create', name: 'Create', component: CreateComponent },
{ path: '/edit/:id', name: 'Edit', component: EditComponent },
]
});
Test the application
You can now proceed to test the application by running npm run serve to start it and navigate to http://localhost:8080 to view it:
Ensure that the backend server is running at this moment, if otherwise, navigate to the backend application from a different terminal and run:
npm run start
Lastly, also ensure that the MongoDB instance is running as well. Use sudo mongodfrom another terminal on your local system, if it is not running at the moment.
Create new customer

Homepage ( View all customers )
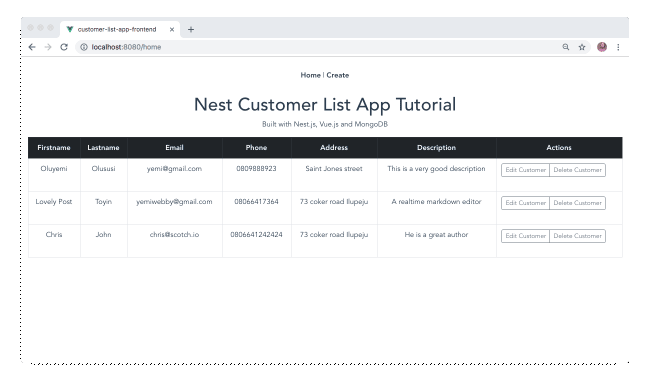
Edit a customer details
Conclusion
In this recipe, you have created a simple customer list management application by using Nest.js and Vue.js. Here, you used Nest.js to build a RESTful backend API and then leveraged on Vue.js to craft a client that consumes the API.
This also has given you an overview of how to structure Nest.js application and integrate it with a MongoDB database.
Related Tutorials
Related Training Courses
Node.JS Coding with Hands-on Training
PHP and MySQL Coding
Intro to Dreamweaver with Website Development Training
Adobe Muse Training Course
Responsive Site Design with Bootstrap
jQuery Programming for Beginners
Advance JavaScript, jQuery Using JSON and Ajax
Private and Custom Coding Classes
We offer private coding classes for beginners online and offline (at our Virginia site) with custom curriculum for most of our classes for $59 per hour online or $95 per hour in virginia. Give us a call or submit our Private Coding Classes for Beginners form to discuss your needs.