Develop bidirectional communication site with Websockets and Express.JS
Recipe ID: hsts-r53
Self-paced training
We offer HTML5, CSS3, JavaScript,Bootstrap, Angular.JS, WordPress Node.JS, React.JS, Joomla, Drupal, Vue.JS and more classes in self-paced video format starting at $60. Click here to learn more and register. For complete self-paced web design training, visit our Web design and development bundle page.
Recipe Overview
In our previous article, we made an intro to real-time bidirectional communications between browsers and webSocket servers. The best way to master socket.io is by building a real-world application, which is what we will be doing in this tutorial. A live score website shows score changes in real time to the user as soon as the administrator updates the scores. We will create a football live score website. Discussing how to build a live score website will help us study socket.io in depth, as it requires socket.io authentication, and optionally, integrating socket.io with Express. Our live score website will provide an admin panel for the administrators to update the score.
In this tutorial, we will cover the following topics:
- Accessing cookies in the socket.io middleware
- Discussing HTTP basic authentication
- Integrating socket.io with Express
- Discussing socket.io authentication
Building the backend
Before we start building the backend of our live score site, let's first set up our directory and files.
We will only write code for the backend and frontend architecture and functionality, not any HTML and CSS design code.
The exercise files of this tutorial contain two directories: Initial and Final. In both the directories, you will find a directory named Live-Score. In the Final/Live- Score directory, you will get the complete live score website source code. In the Initial/Live-Score directory, you will only find HTML and CSS files for our live score site. The Initial/Live-Score directory is to help you quickly get started with building the live score site.
In the Initial/LiveScore directory, you will find the public directory, app.js file, and package.json file. Inside the public directory, you will find css, html, and js directories. In the css and html directories, you will find HTML files and CSS files for our user and administrator pages. In the js directory, you will find admin. js and index.js files, inside which you will place the socket.io client code for the administrator and users, respectively. Similarly, in the html directory, you will find index.html and admin.html files that will be served to the users and administrator respectively.
Inside the package.json file, place the following code:
{
"name": "Live-Score", "dependencies": {
"express": "4.13.3",
"socket.io": "1.3.7",
"basic-auth": "1.0.3",
"socket.io-cookie": "0.0.1"
}
}
Now run the npm install command inside the Initial/Live-Score directory to download express, socket.io, basic-auth, and socket.io-cookie
npm packages.
Integrating socket.io server with the Express server
We can integrate the socket.io server with the Express server with just a few lines of code. Here is the code to integrate the socket.io server with the Express server.
Create an app.js file and place the following code in it:
var express = require("express"); var app = express();
var server = require("http").createServer(app);
var io = require("socket.io")(server, {path: "/socket-io"});
server.listen(8080);
The fourth line is where the main integration happens. Here we are using the /socket-io path for socket.io handshaking.
Finally, we are listening on port number 8080. That is, both Express server and socket.io server will listen on port number 8080.
Serving static files and HTML to the users
Now we need to write the code to server HTML, CSS, and JavaScript files to the site users. The following is the code to do this. Place this code in the app.js file right after the previous snippet:
app.use(express.static( dirname + "/public"));
app.get("/", function(httpRequest, httpResponse, next){ httpResponse.sendFile( dirname + "/public/html/index.html");
})
Here, the first line of the code is serving static files. The rest of the code is serving index.html to the site users when they visit the root path.
Serving HTML to the administrator and protecting the admin panel
We only want the administrators to access the admin panel to update the scores. So, for visitors to access the admin panel, they must enter the username and password. We will use the HTTP basic authentication to protect the admin panel.
The following is the code to authenticate and serve HTML to the administrator:
var basicAuth = require("basic-auth");
function uniqueNumber() { var date = Date.now();
if (date <= uniqueNumber.previous) { date = ++uniqueNumber.previous;
} else {
uniqueNumber.previous = date;
}
return date;
}
uniqueNumber.previous = 0; var authenticated_users = {};
var auth = function (req, res, next){ var user = basicAuth(req);
if(!user || user.name !== "admin" || user.pass !== "admin")
{
res.statusCode = 401;
res.setHeader("WWW-Authenticate", "Basic realm='Authorization Required'");
res.end("Access denied");
}
else
{
var id = uniqueNumber(); authenticated_users[id] = id; res.cookie("authentication_id", id); next();
}
}
app.get("/admin", auth, function(httpRequest, httpResponse, next){ httpResponse.sendFile( dirname + "/public/html/admin.html");
})
Here is how the code works:
- First, we imported the basic-auth library, which is used to implement basic authentication in Express.
- Then, we wrote a custom function to generate a unique number whenever it's called.
- We also created a function with the name auth, which will be used to check whether the visitor is authenticated. If not, then we will send an HTTP status code 404, asking the visitor to provide the username and password. If the visitor is authenticated, then we will generate a unique number and store it as a cookie in the administrator's browser. Later on, this cookie will be used by the socket.io server to check whether the administrator is authenticated.
- Finally, we created a route with the /admin path, which has two route handlers attached to it. The first one is the auth function to check for authentication and the second serves the admin.html file.
Socket.IO cookie authentication and broadcasting messages to a namespace
We will have two namespaces in our socket.io server: the default namespace where users will connect and the /admin namespace where the administrator will connect.
A socket.io client will not require authentication to connect to the default namespace. However, to connect to the /admin namespace, the socket.io will need authentication.
Updates made by the administrator will be broadcasted to all the users in the default namespace.
Here is the code for creating the /admin namespace, broadcasting messages to the default namespace, and implementing authentication for the /admin namespace. Place this code in the app.js file:
var cookieParser = require("socket.io-cookie"); var admin = io.of("/admin"); admin.use(cookieParser);
admin.use(function(socket, next) { if(socket.request.headers.cookie.authentication_id in authenticated_users)
{
next();
}
else
{
next(new Error("Authentication required"));
}
});
admin.on("connection", function(socket){ socket.on("message", function(message){
io.send(message);
});
})
Here is how the code works:
- First, we imported the socket.io-cookie middleware, which is used to parse the HTTP Cookie header
- Then, we created the /admin namespace
- We also parsed the cookie using the socket.io-cookie middleware
- Then, we wrote our own middleware to check whether authentication_id exists, and if yes, then whether it was valid
- Finally, we listened to the message event and broadcasted the message to the users in the default namespace
Now we are done with our backend. Run the node app.js command inside the initial directory. Then visit http://localhost:8080 and http://localhost:8080/ admin in any browser. Here, I am assuming that you are running the Express server locally.
When you visit http://localhost:8080, you will see the following screen:

There is nothing inside the box yet as the user hasn't received any messages.
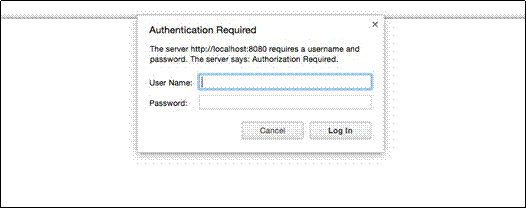
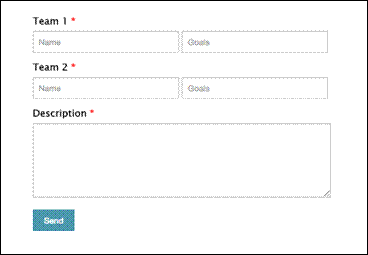
When you visit http://localhost:8080/admin, you will see the following screen:

Now enter admin as User Name and Password and click on Log In. You will see the following screen:

Building the frontend
Let's write the frontend code for the users and administrators. socket.io client instances of users will listen to incoming messages from the server and display them. Whereas, socket.io client instances of administrator will send messages to the server so that the messages can be broadcasted to the users.
The following is the socket.io client code for the users. Place this code inside the index.js file:
var socket = io("http://localhost:8080", {path: "/socket-io"});
socket.on("connect", function () { socket.on("message", function (msg) { document.getElementById("messages").innerHTML =
"<li><div><h4>" + msg.team1_name + "(" + msg.team1_goals + ")
: " + msg.team2_name + "(" + msg.team2_goals + ")" + "</h4><p>" + msg.desc + "</p></div></li>" + document.getElementById("messages").innerHTML;
});
});
This code is self-explanatory.
Here is the socket.io client code for the administrators. Place this code inside the admin.js file:
var socket = io("http://localhost:8080/admin", {path: "/socket-io"});
document.getElementById("submit-button").addEventListener("click", function(){
var team1_name = document.getElementById("team1-name").value; var team2_name = document.getElementById("team2-name").value; var team1_goals = document.getElementById("team1-goals").value; var team2_goals = document.getElementById("team2-goals").value; var desc = document.getElementById("desc").value;
if(team1_goals == "" || team2_goals == "" || team1_name == "" || team2_name == "")
{
alert("Please enter all details");
}
socket.send({
team1_name: team1_name, team2_name: team2_name, team1_goals: team1_goals, team2_goals: team2_goals, desc: desc
});
}, false)
This is how the preceding code works:
- In the first line, we connected to the socket.io /admin namespace. If the cookie is invalid in any case, then the connection will fail.
- We also made sure that the team names and their scores are filled, otherwise we will display an alert message asking them to enter all the details.
- Then, we sent the message to the socket.io server.
Testing the website
Now we are done building our live score website. To test the site, refresh the
http://localhost:8080/ and http://localhost:8080/admin pages.
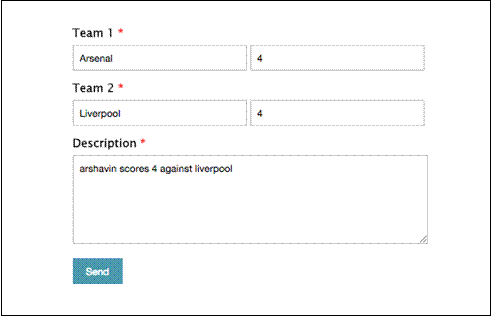
Now, in the admin panel, fill the form with some sample data, and click on the
Send button:

On the user page, you should see something similar to the following image:

Summary
In this tutorial, we saw how to build a live score website using socket.io and Express. You should now be comfortable with building any kind of application that requires bidirectional communication in real time. You should now try building a chat application, multiplayer game, or something else where socket.io would be very useful.
So, overall you learned socket.io in depth, WebSockets, and bidirectional communication.
Here are related articles if you wish to learn more advance topics for web development:
Best practices for securing and scaling Node.JS applications
Comprehensive overview of Angular 2 architecture and features
How Bootstrap 4 extensible content containers or Cards work
Comprehensive guide for migration from monolithic to microservices architecture
Comprehensive overview of Bootstrap 4 features for user interface customizations
Intro to functional reactive programming for advance js web development
Using advance js and webrtc for cross browser communications in real time
Intro to real-time bidirectional communications between browsers and webSocket servers
Junior or senior web developers can also explore career opportunities around blockchain development by reading below articles:
Blockchain Developer Guide- Comprehensive Blockchain Ethereum Developer Guide from Beginner to Advance Level
Blockchain Developer Guide- Comprehensive Blockchain Hyperledger Developer Guide from Beginner to Advance Level
Here are more hands-on recipes for advance web development:
Build advance single page application with Angular and Bootstrap
Develop microservices with monolithic core via advance Node.JS
Develop server-side applications using microservices with Seneca.JS
Advance UI development with JS MVC framework and react
Develop advance JavaScript applications with functional reactive programming
Develop advance webcam site using Peerjs and Peerserver with Express.JS
This tutorial is developed by Narayan Prusty who is our senior Blockchain instructor.
Related Training Courses
Hands-on Node.JS, MongoDB and Express.js Training
Advance JavaScript, jQuery Using JSON and Ajax
Developing Web Applications Using Angular.JS
Design websites with JavaScript React in 30 hours
Blockchain Certified Solution Architect in 30 hours
Advance JavaScript, jQuery Using JSON and Ajax
Introduction to Python Programming
Object Oriented Programming with UML
Private and Custom Coding Classes
We offer private coding classes for beginners online and offline (at our Virginia site) with custom curriculum for most of our classes for $59 per hour online or $95 per hour in virginia. Give us a call or submit our Private Coding Classes for Beginners form to discuss your needs.